Showing posts with label crafts. Show all posts

Wednesday, March 30, 2011

Day 53

I stayed home from work today, I was just feeling run down both physically and mentally and I needed to just take today for myself.  I did a lot of thinking today, about things going on around me, with family and friends.  About things that I want the future to bring, trying to learn from the past, what to do to make tomorrow all it can be.  I won't bore you with details, let's just leave it at "I thought a lot today"...okay!  :)  

Because of all the thinking, it inspired me to do a Haiku.  I just realized that I'm doing a lot of Japanese crafts lately, I'm not sure why that is!  

What is Haiku?  Haiku is one of the most important form of traditional Japanese poetry. Haiku is, today, a 17-syllable verse form consisting of three metrical units of 5, 7, and 5 syllables. 

So with that, here is my Haiku titled "Food for thought":

Full of emotion
Triggers thoughts, many feelings
Good or bad, it’s there

Friday, March 25, 2011

Day 48

So I was thinking all day that I just wanted to come home, do a simple craft and relax.  My first thought...bookmark.  I realized today that I had contact paper for a wedding craft I had planned and could use it as a laminate.  I mention all this to Stan and he helps me find a bookmark template online to make it even easier, just need to insert a photo and quote.  BONUS!  I tell him I want a picture of a moon, and he starts searching while I go to my trusty book of quotes to find something relevant.  I figure this will be done in no time...

Not so much...

Stan finds a nice picture, I find a good quote, we insert, print...and realize I had regular paper in the printer, so we print again, on white card stock.  Alright, no big deal.  I pull out my paper cutter, and the stupid thing is of course not cutting straight, so I try to fix it with regular scissors and I'm not straight.  I have a minor temper tantrum and have Stan trim for me.  Okay, I'm alright now, so I get out the hole punch and punch the hole at the top of the bookmark for the fringe string I want to add.  Low and behold I'm too close to the top, and end up splitting the hole open at the tippy top!  O..M..G...I fall to the ground and start slamming my head against the floor.  (Don't worry, we have carpet!)  I beg Stan to go downstairs and pop open a bottle of wine while I try to now cover the bookmark in contact paper to salvage the hole for the string.  I'm starting to hate bookmarks.  Alright, contact paper....I've never used it before, I cut a nice big square, put the bookmark face down close to the left side and fold the right side over to sandwich the bookmark.  Guess what??  I'm not straight, so the contact paper buckles and sticks...I toss the bookmark across the desk, and start swearing like a sailor.  Stan comes with wine...after a long silent gulp...yes, I admit it, a gulp...I feel better.  Stan takes over and trims it up for me.  Wine slowly goes through my body, I'm now feeling better.  I get the string and start stringing it through the now complete hole and can't get the knot to tie.  I keep trying while silently laughing manically in my head.  After about 5 attempts, I get it, I cut trim, I'm DONE!!!!

YAY!!!

And then I try to take pictures....sigh...our cat Cody decides he needs to help....sigh....I send Stan down for another glass of wine....here are the pictures..../headdesk

Bookmark with Cody trying to get the camera strap:


Close up or bookmark:


Another closeup and Cody:


Cody willing to rip my face off for the camera strap:

Sunday, March 20, 2011

Day 43

I was having a serious case of "NeedToGetOutOfTheHouse-itis", so I dragged mom up to Yankee Candle in Deerfield.  There is nothing like visiting the flasgship store to get me out of a funk.  You can not leave there sad.  We had a lot of fun, enjoyed looking at all the new spring stuff and picking up some votive candles.

After Yankee Candle we went to a store across the street called The Final Markdown (which always puts the song "It's the final countdownnnnn" in my head, and I will now be singing it for days!).  The store basically sells the scraps from bigger name stores.  I picked up a few kitchen supplies, like a new cutting board, an ice cream scoop and a pizza cutter all for like $2.00 each!  Then I saw in the kids section this craft and I just knew it had to be done.  I was considering skipping today's crafts all together, but I haven't done that yet, and I don't want to start now.

This craft is Spongebob Foam Mosaics.  It comes with two pictures, one of Spongebob and one of Patrick, and a few sheets of various colored foam stickers.  There are little squares all over the pictures and you just basically match the foam squares to the colored squares on the picture.  I'm learning though that crafts for children are not easy!  For me anyway!  This one is for 4 and older, and I almost gave up!  Of course most 4 year old's don't have fake nails, on which all the little mosaic tiles can stick too.  So needless to say, most if not all of the mosaic tiles do not line up and I got to the point where I was just sticking them wherever.  It's cute though, and Patrick is awesome, so can't complain too much!


Wednesday, March 16, 2011

Day 39

Tomorrow is St. Patrick's Day!  And I realized I have nothing green, again...!  I own NOTHING that is even a slight shade of green!  Not even a hint of green!  Actually I do have a gray sweater that if you hit the light juuuusst right, it "could" be green, a puke green maybe.  Well I didn't want to wear my, in certain light puke green sweater for the holiday, so I decided to make something to wear.  After all I don't want to get pinched!

Since I have the Shrinky Dink paper I printed a shamrock on it.  I cut it out and shrunk it (cause that's what you do with Shrinky Dinks!) and glued a pin to the back and there you go, an Irish pin so I don't get pinched!  I have a feeling I'll still get pinched, but I tried, and really....that's all you can do!

Pin before shrinkage:


Pin after the shrinkage:


Back of pin, after I took this picture I turned the pin the other way, so it's now the "long" way (glue needs to dry):

Friday, February 25, 2011

Day 20

Because this is a wedding craft, I can't go into details.  Here is a really horrible picture to keep you guessing!  This is sort of a cheat because I have to make several of these, and it's going to take some time, but this is one of many.  You will have to come to the wedding to see what it is!!!  ;-)

Monday, February 21, 2011

Day 16

Today I was stumped for ideas.  I looked online, I looked in my books, I looked at all my craft items and I was coming up blank.  As I was looking around the room I found a candy box from Valentine's Day.  I had picked up two mini boxes of chocolates, one for me and one for Stan.  Four little delicious pieces of chocolatey goodness.  Stan loves to save boxes, he just adores them.  So we had these two laying around and I found a use for at least one!

I decided to make a gift box.  I had some Spring themed cardstock, and quilling paper.  I originally was going to make a flower motif on the cover, but I didn't have enough of the yellow quilling paper so decided on this design instead.  In the pictures, you can still see the white of the glue, but it will dry clear. 

The box is tiny, so it will be nice to put some jewelry or some other small trinket in it. 

BEFORE:

TOP AFTER:

SIDE AFTER:

 BOTTOM AFTER:

TOP & INSIDE AFTER:

Monday, February 14, 2011

Day 9

I could not for the life of me figure out what to do today, so I enlisted Stan's help.  He suggested a frame, and I have had this picture of our cat Rascal (aka "Coo Coo") sitting next to my alarm clock for a while frameless, so this was a great opportunity to get him looking even cuter!  

I had an empty cardboard box that I cut down to about an inch bigger then the picture on all four sides.  I glued the picture to the cardboard, used acrylic paint around the edges in blue, stuck the various stickers on it and added the brads in the "I love my cat" banner.  On the back I stuck an extra piece of cardboard in a triangle to hold the frame up.  Overall an elementary but totally adorable frame.  It's super cute, but that might just be the picture!!  Below are some not so good pictures of the frame, the lighting is really bad.  Also, there is a picture of Izzy trying to help get a good shot.  Obviously it didn't help.  :) 


Sunday, February 13, 2011

Day 8

Today's craft was tricky!  I chose it because I really thought it was going to be simple and quick.  I have tons of books around the house and most of them I will never pick up again, so I had purchased a book on how to do crafts with old books (lots of irony there, huh?!).  One of the crafts was to make mats using rolled book pages, white glue and bobby pins.  I decided to make a drink coaster. 

The hardest part was rolling the pages!  Tricky little things.  I don't know why I had such a problem with it, I guess maybe the way the book paper was, I'm not sure, but each roll ended up being a bit different size then the last, and they were all supposed to be "uniform".  The book suggested using a "rolling tool, such as a dowel", but all I had was a BBQ skewer, so that's what I used.  It wasn't much help!  After I rolled each page, I used white glue along the edge, held it, got glued to the paper, got unstuck, got glued to the table mat, got unstuck, got restuck to the paper, swore, shook off paper and started on the next roll.  I did this 20 times as per the instructions.  After letting the glue dry, and attaching the rolls side by side with bobby pins, I realized I only needed 14 rolled pages, so I got stuck on paper/mat/paper 6 more times then was neccessary.  I swore again. 

After all that, I was pretty happy with the outcome.  Upon showing Stan, he tried to blow into the ends, saying it looked like a pan flute.  I then showed my mom, who was in a different part of the house and had no idea what Stan said.  She proceeded to try to blow into the ends, saying it looked like a pan flute.  I then showed our dog Izzy, who proceeded to try to eat it.

No one knows good coaster art when they see it!


Saturday, February 12, 2011

Day 7

The other day I was looking on Amazon.com for some craft books and I came across "Zombie Felties" by Nicola Tedman & Sarah Skeate.  The cover alone is enough to make you "SQUEE"!  (Think I'm kidding?  Go to Amazon and look it up!)  So I ran over to the bookstore and scooped it up.  As I was checking out the cashier did her own "SQUEE"ing, so I knew it was a hit.  Zombies are cute, I don't care what anyone says.  I waited all week to do this project.  I cut out the template during the week, that was pretty time consuming, because these pieces are small, tiny even!  And with my sausage fingers, I was a bit worried, but I was determined, and determination can overcome chubby fingers! 

The pieces of the dog and the bone are felt, the eyes are beads, the head is stuffed with toy stuffing, the black/white nose, pink gums and blood on the bone are all sewn with embroidery thread.  The dog and bone are put together with some craft glue and hand sewing, and I had a BLAST!  I really enjoyed this project, even though our dog Izzy tried to eat a skein of thread and one of the cats decided to roll all over the cut pieces of felt and tried to walk away with felt pieces attached to his back.  I forgive them....the project, with animal interference and laundry breaks took about 3 hours give or take.  Now let the cuteness begin...


Thursday, February 10, 2011

Day 5

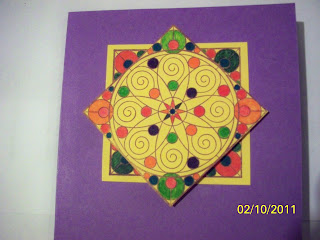
Hallmark watch out!  Okay, well maybe not.  I did have other ideas, but I realized that they would take more then a day to finish.  Since I only have an hour or two when I get home at night, I think my options are going to be limited.  Maybe once I get into a better routine, I'll be able to whip out more advanced projects.  In the meantime, here is another card.  This one will go in the "when needed" box for now, so I didn't designate it an occasion. 

The design is a stamp that I inked and stamped two different times on yellow paper.  I cut both designs out and colored them in, and then used a 3D pop dot to stack the designs to get the popped effect.  I like it lots!  Once I find a use for the card, I'll add words and maybe some other decorations, but for now, it's perfect! 


Sunday, February 6, 2011

Day 1

Perhaps I'm crazy. We are in the midst of DIY'ing our wedding for September. But I'm always one to find an excuse to craft, and always in need of a push, some sort of starting point, so when I came across the book "365: A Daily Creativity Journal" by Noah Scalin, I realized this was a fun way to spend the next year, and I can incorporate the crafting for the wedding into this project. Also, when the wedding has come and gone, I was worried that I would have some type of DIY withdrawl, so this is a way for me to keep going, once the wedding madness is over!

One of the things I decided was that for 2011 I would buy no more cards! I'm sick of giving money to Hallmark when I have the means to make my own. Granted my cards will in no way be as wonderful as Hallmarks, but I can guarantee mine will have more love in it's little card soul then any I have ever purchased! So for my Day 1 craft I decided to make my friend's birthday card.

When I saw the little butterflies in all their glitter glory, I just knew I had to use them, and I'm glad I did. The inside has a quote about friendship and a "Happy Birthday" chipboard sticker, and overall for my first card, I'm happy with it. Hopefully with every card I do, they will get a bit more better, but this was a good start.