Showing posts with label craft glue. Show all posts

Friday, May 13, 2011

Day 96

I did this craft yesterday, but the site was down for maintenance so I wasn't able to post it.

I did a really cute green bookmark.  I took two pieces of green glittery cold stock and cut them down to about 3 1/2" x 5", I then took some green paisley fabric I had and cut it down a little smaller then the card stock.  I took one piece of the card stock and used a butterfly paper punch to do a haphazard design of flying butterflies.  I used a round paper punch for all four corners of the card stock on both pieces.  I then used craft glue to glue the fabric to the un-punched side of card stock and then sandwiched the butterfly punched piece on top.  It came out really good!  I really like the way it feels, the glittery paper and then the fabric peeking through.  One of my favorites I've made so far!

Here it is finished:


Here is the paper I used, cut down:


And the fabric I used:


And here is everything cut and punched, getting ready to glue it all together:


Close up of the finished bookmark:


Another shot of the finished bookmark:

Wednesday, May 4, 2011

Day 88

I was playing around online earlier and just happened onto this craft, totally by accident, and I just knew I had to do it because I needed something funny and cute and really meaningless.  Fun was the order of the day.

If you have ever visited the website "I Can Has Cheezburger" you know where this craft came from.  Someone turned Ceiling Cat into a paper craft, and if I knew where they lived, I would hug them.  The site for this template can be found HERE.

Basically what I did is printed the template out on white card stock, cut the cat head out and the ceiling square, used a bone folder to go over all the folding lines, folded everything and taped (not glued, since I was having a heck of a time with the glue) all the folds down to form the cat.  Then I used white craft glue to stick the cat head to the ceiling hole.  And then I adored it lovingly! 

Here is what it looks like when I finished...(I can't put it on the ceiling until the glue dries and don't think I'm not going to, because it's too cute not to stick it up there!):


Here is ceiling cat and ceiling panel all printed and cut out on white card stock :


Used bone folder to get all the creases:


Taped the cat head:


And glued the head to the ceiling tile:

Friday, April 29, 2011

Day 83

I have this really pretty peacock themed scrapbook and card stock paper that I wanted to use tonight but wasn't really sure how to.  I decided a mosaic style card might be a nice way to showcase the different papers.  I was trying to be precise about my cuts and then realized I wasn't getting anywhere trying to figure out measurements, so I just went for a haphazard approach, which when your crafting seems like a fantastic idea!

I picked a pretty blue card stock for the actual card, I then picked three different peacock themed card stock to go with it.  I cut each peacock paper into three strips and then each strip into squares.  I then applied each square to the blue card stock in a varied pattern.  It was really hard to photograph this when I was done because the paper is very shiny.  But here is what I came up with:

Done card:


Here are the  papers I used after I cut the peacock paper into strips:


Here is a close up of the finished card, trying to get a bit more detail:

Thursday, April 28, 2011

Day 82

The other day I was doing a search online for craft ideas and I came across a bookmark called "Honey Bunny" and I just knew I had to make it and who I had to make it for! 

My Ome (my mom's mother) calls me Honey Bunny, she has since I can remember, and still does, even though I'm in my 30's and honestly if she ever stopped, it would break my heart.  I couldn't believe there was a craft called "Honey Bunny" and it made me grin like a little girl when I saw it.  Here is the link on how to make it:  Honey Bunny Bookmark

I hope she likes it!  Here it is done:


Here is the template I printed on pink card stock:


And here are some of the supplies I used, chenille pipe cleaners, craft glue, also used scissors and contact paper to laminate the template:


Laminated the template with contact paper, cut it out and then cut out the face area:


Wrapped the top of the bookmark in the pipe cleaners:


Printed a picture of my face and glued it on the circle I originally cut out and glued into the hole:


Here is the back, I looped some pipe cleaners and glued them onto the back of my picture:


Wednesday, April 27, 2011

Day 81

I do believe I am suffering from crafter's block, or something like that.  Work has been keeping me so busy and I'm thinking that has something to do with it!  The nerve of them, don't they know they need to back off!  :)  Ah well...

I decided to go with another card today, just an everyday, all occasion card.  We have these three little wire rings, that honestly I can't remember where they came from, but I know Stan said to keep them because I might be able to use them in a craft.  I'm glad he had me save them. 

I took the three wire rings, some extra decorative scrapbook paper and pink card stock to make the card.  I used some decorative scissors to cut the scrapbook paper, to give it a cute "different" look and glued that onto the card stock, then glued the wire rings over the scrapbook paper.  I really like the way it looks!

Here is the finished card:


Here are the supplies:


And again, the finished card, you can see the white glue holding the wire rings, but that will dry clear:

Friday, April 22, 2011

Day 76

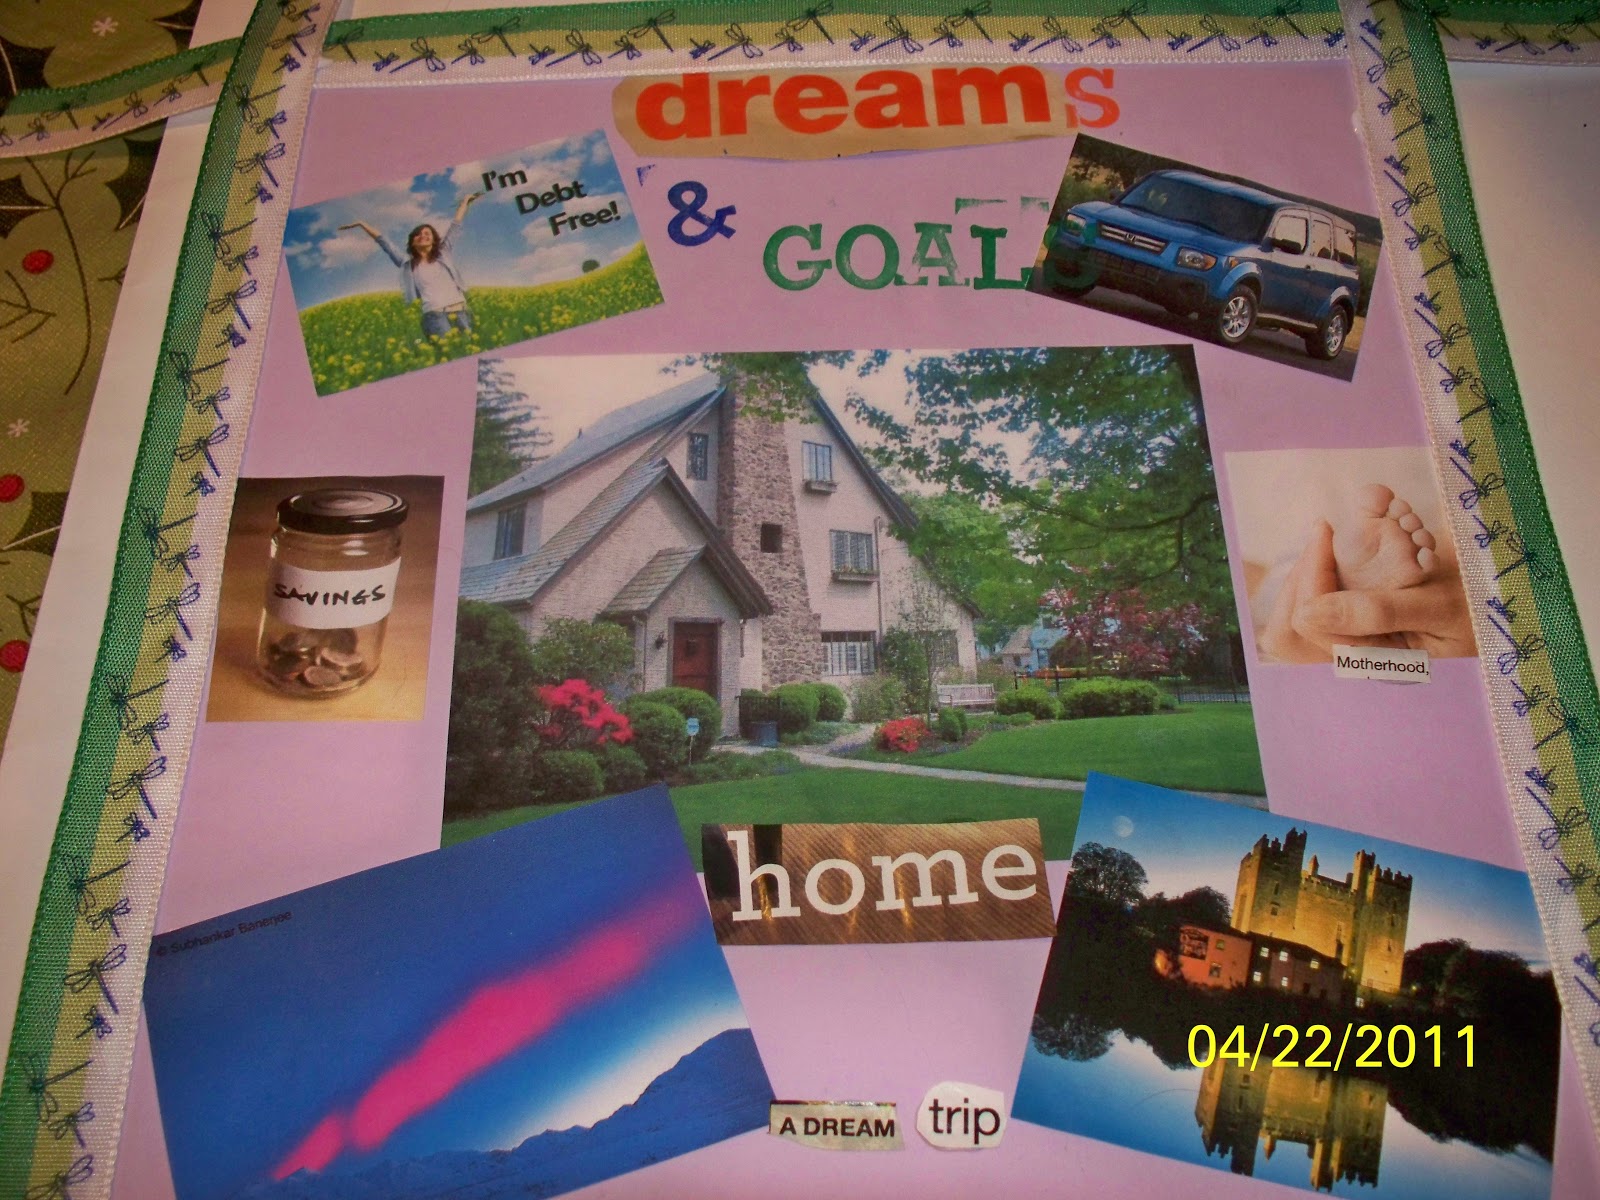
I have been thinking a lot lately about the goals I have, the things I want to accomplish and I decided to make a "dream board" or an "inspiration board" to keep me grounded and to remind me what I want to accomplish.

I had a piece of cardboard at work that was approximately 9" x 9" and decided that was a good size to do the board.  I went online and found photos of things that represent the dreams or goals that I have.  They are: a Tudor style home (my dream home), a Honda Element (my dream car), a woman celebrating getting out of debt (my goal), a jar of "savings" (my goal, to save money),  a baby's foot (my dream to have children), a photo of
aurora borealis/northern lights over Alaska (one of my dream trips) and a castle in Ireland (my other dream trip).  I printed and cut these pictures out and arranged them how I wanted.  I went back and glued a light purple card stock over the cardboard, then glued the pictures on the card stock.  I then went through a few magazines to find some wording and glued those on.  For the words I couldn't find in the magazine I used my rubber stamp letters.  Lastly, I trimmed the cardboard frame in dragonfly ribbon to just give it a more finished look.  Once the glue dries, I'll trim the ribbon on the edges and hang it up where I can be reminded of what my goals and dreams are in case I forget!

Board all finished:


Here is the cardboard and pictures cut out, getting ready to arrange it all:


Glued the purple card stock on the cardboard:


After everything was glued, another finished photo:

Monday, April 18, 2011

Day 72

I love applesauce!  And Stop & Shop has a delicious unsweetened applesauce that I buy in those huge jars.  And I go through one a week.  I was starting to feel bad about throwing out that huge jar every week (though we do recycle) so this last one I decided to keep and use again.  I have tons of buttons and decided that this would be a perfect container to hold them, once it got a makeover of course.

I pulled out some red and black ribbon, some craft glue and Cody (because apparently I can't craft without him) and got to work.  Once the glue dries I'll go back and secure the ribbons a bit more, but for now, this is how it looks, oh and I painted the lid black, but that needs to dry too:


Here is the jar and ribbon before I got started:


With the red ribbon attached (and Cody at the top right supervising):


And now the black ribbon:

Thursday, March 10, 2011

Day 33

Spring is closing in quickly, this week has been in the 40's and next week even has a few days that are supposed to be in the 50's.  With the warmer weather the wild life begins to stir and things we haven't seen in months are not making appearance.  I saw the first house spider last weekend, they run rampant in our house during the warmer months, so seeing the one, I know there will be more in no time.  We usually have ladybugs, beetles, flies, you know, the run of the mill house "bugs".  So it was only a matter of time before I caught a house fairy.

Yes, a house fairy...

We all know they exist, even if we don't want to admit it.  We don't see them as often as we used to - when we were kids, losing our teeth and waiting for our dollar under our pillow.  Once all our teeth had been replaced by those dollar bills,what other reasons do we really need them to show up, or so they might think.  But they still come around, still keep an eye on us.  I think as we get older, we just tend not to pay much attention to them, unless of course, when something goes missing.  Those adorable little fairies just love to hide keys and glasses!

Anyway, since it's still chilly out, the snow hasn't exactly melted, the next few days will be rainy...and when I saw this little beauty fluttering around, I decided to trap her, but don't worry, it's only until the weather warms up and the days get longer...

I put some little purple and pink jewels in the bottom with some glitter, as it's well known, fairies love shiny things, and decorated the outside with a paper rose and shiny blue ribbon....

Sunday, February 27, 2011

Day 22

I think it's no secret that I love Stan.  I think he's just the cutest, most lovable, most wonderful man I have ever met.  I think since we have been together for 7 years now, sometimes we get complacent in showing our love for each other.  Because of this, I decided to make him something that will remind him daily, even hourly that I love him so very much.

I had a matchbox laying around and saw an ornament craft in one of my books, so that's where I got the idea.  I have always loved miniature crafts, but never really do them because of my sausage fingers!  I end up getting in my own way and it causes me to just have a temper tantrum and abandon the thing I'm working on...forever! 

I pulled out some leftover stickers from Valentines Day, some paint, card stock, a heart punch and the glue and set to work.  I cut purple card stock and glued it on all the sides inside the matchbox.  While that was drying I cut a window into the matchbox sleeve and painted (or tried to paint) it pink.  The paint wasn't thick enough to cover the design on the matchbox, so you can see that it came from a steakhouse.  (I'll go back to that in a minute!)  I took the 3D stickers, added pop dots to the back so they would be even more 3D and put those inside the matchbox.  I then cut out hearts with a punch and glued those to the sides of the matchbox sleeve.  I added some more 3D hearts to the back of the sleeve, so all the sides would have some pizazz!  Then I poked two holes in the top of the matchbox and threaded some 24 gauge wire and formed a heart, sort of like a little handle. 

When I presented it to Stan, I'm happy to report he didn't think I was corny and he loved it.  When I pointed out that you can see the word steakhouse on the cover, he said "well when I look at it, it will remind me how much I love you and steakhouses!"  :)  I love him. 

This is the full front view all completed:


This is the sleeve and matchbox, can be taken out to see details:


And here is the side of the sleeve:


And now the back:


And now a close up of the back:


After I finished making this I made grilled cheese for lunch, and being in a miniature mood, I made our dog Izzy a mini grilled cheese...she loved it!:

Monday, February 21, 2011

Day 16

Today I was stumped for ideas.  I looked online, I looked in my books, I looked at all my craft items and I was coming up blank.  As I was looking around the room I found a candy box from Valentine's Day.  I had picked up two mini boxes of chocolates, one for me and one for Stan.  Four little delicious pieces of chocolatey goodness.  Stan loves to save boxes, he just adores them.  So we had these two laying around and I found a use for at least one!

I decided to make a gift box.  I had some Spring themed cardstock, and quilling paper.  I originally was going to make a flower motif on the cover, but I didn't have enough of the yellow quilling paper so decided on this design instead.  In the pictures, you can still see the white of the glue, but it will dry clear. 

The box is tiny, so it will be nice to put some jewelry or some other small trinket in it. 

BEFORE:

TOP AFTER:

SIDE AFTER:

 BOTTOM AFTER:

TOP & INSIDE AFTER:

Thursday, February 17, 2011

Day 12

I'm really proud of today's craft!  It's a "tea box notebook".  The premise of the craft is in a book I bought called "Craftcycle: 100+ Earth-Friendly Projects and Ideas for Everyday Living", but I'll be honest, I didn't understand the directions!  So I winged it, and I'm really pleased with the outcome.  My design has a little flap and flap holder on the inside, so it will stay closed when it's in my purse.  I really like it! 

I used an empty tea box, scissors, craft glue, stapler and white copy paper.  Took me less then an hour to cut, glue and staple everything.  If I knew what I was doing, it would have gone faster, but since I had to figure this out as I went, I think I did good.