As you may have noticed, I have stopped doing my one craft a day for a year project. I admit it, after seriously burning two of my fingers I got discouraged and gave up. But I really miss crafting, and sharing my projects. So instead of doing one craft a day for a year, I have decided to be "normal" and do crafts as time permits and sharing those when I finish. I think it will be much more enjoyable, less stressful - without having to figure out a new craft everyday, and give me the opportunity to do more things, slower, to really enjoy the process once again.
My new interest is "Art Journaling". I haven't given it a try yet, but have been researching ideas and getting myself in a position where I feel comfortable giving it a go. I hope to share them on this blog as time goes on.
If you are reading this, thank you for sticking by me and giving your support to my eclectic crafts! I hope to have a craft to post as early as this weekend so I look forward to seeing you again soon!
Tuesday, July 26, 2011
Sunday, May 15, 2011
Day 99
Today's craft had the potential to be a good one, however I ended up with a third degree burn on my finger tip. Glue guns are evil...and for the record, yes...this is my second burn for those keeping count...
I had the storage box that I had painted blue and had traced the Celtic design on to later paint. After ruining the paint job I decided to cover the lid in fabric. I don't have a staple gun so I pulled out the glue gun. The first two sides went well, but while gluing the third side I was watching TV while pushing down the fabric, the glue oozed out and attached to my right ring and middle finger tips, and in a panic running around the bedroom I pulled the glue off my ring finger and in doing so took off all the skin under the glue. I (guess) luckily I didn't rip the glue off both finger tips, but now my middle finger is caked in dry glue and any attempt to remove it pulls off the blister underneath!! I was tempted to go to the ER because that's how freakin bad it hurt, and I have no idea how anyone with third degree burns all over their bodies do not just die from the pain!
So after some near hysterical crying, a slather of petroleum jelly, then trying to wash it off while my sister ran over to the drugstore for some antibacterial spray, gauze and gauze tape...I'm almost feeling okay. Of course I can now only use my thumb and pointer finger on my right hand to type, so work should be interesting tomorrow! Depending on how tomorrow goes, I might have to put crafting on hold for a few days, unless I can find some easy craft ideas...will have to look around.
Anyway, here is today's craft, almost done...one side is not glued, but I tucked it in so you can see how it looks. Overall I think it looks good though!
Here is the storage box all covered:

Here is how it looked before I covered it, see the bad paint job:
And a close up of the material I used:

And here it is finished:

And here are my bandaged fingers thanks to Maegan & Mom. UPDATE: I ended up going to Urgent Care the next day. They confirmed third/second degree burns, gave me a prescription for pain meds and some cream to put on the burns and sent me on my way. I'm all healed now, no scarring, but the hot glue gun has been banned from the house by the hubby! :)

Saturday, May 14, 2011
Day 98
Today I worked on our Shih Tzu Izzy's treat jar. I did it pretty much the same as the cats except this time I added bones and the words "woof" and "grrrr". And on the top I wrote "Izzy's Treats" instead of "Do I Have To Beg" like I did on the cats. It came out just as cute as the cats, and I'm just waiting for it to dry to put her new treats in, which are frosted and sprinkled ginger cookies that I bought from Petco! She's so spoiled...
Here is is finished:


Here is is finished:

Here it is before I did anything:

A close up of the lid:

A close up of one side:

And a close up of another side:

A close up of the other side...yeah, they all look the same!:

Friday, May 13, 2011
Day 97
Today's craft was inspired by a treat jar I saw online. I was at Michael's craft store the other day and picked up two glass jars that have a seal, one a bit bigger then the other. This is the smaller of the two for the cat treats. We have been keeping the treats in the bag they come in, but sometimes the bag doesn't get closed all the way and the treats dry out. Such a waste of money! This way they treats will stay fresh and the jar is adorable.
I used enamel glass paint in black and red to make cat paw prints and little hearts. I have never made these designs on glass with a paint brush and the brushes I have aren't the best for small painting so the prints and hearts are a bit messy, but overall I think it came out cute! And I put "Don't Make Me Beg" on the top for added charm. Be sure to check out the last picture of Cody checking it out...
Here it is done:

Here is the jar plain, the way I bought it:

I started painting it:

All done!:

Another view:

And another:

Close up of the lid:

And here is Cody showing his indifference to the finished jar, I think he would like it more if it was full of treats! But it had to dry....:

Day 96
I did this craft yesterday, but the site was down for maintenance so I wasn't able to post it.
I did a really cute green bookmark. I took two pieces of green glittery cold stock and cut them down to about 3 1/2" x 5", I then took some green paisley fabric I had and cut it down a little smaller then the card stock. I took one piece of the card stock and used a butterfly paper punch to do a haphazard design of flying butterflies. I used a round paper punch for all four corners of the card stock on both pieces. I then used craft glue to glue the fabric to the un-punched side of card stock and then sandwiched the butterfly punched piece on top. It came out really good! I really like the way it feels, the glittery paper and then the fabric peeking through. One of my favorites I've made so far!
Here it is finished:

Here is the paper I used, cut down:

And the fabric I used:

And here is everything cut and punched, getting ready to glue it all together:

Close up of the finished bookmark:

Another shot of the finished bookmark:

Wednesday, May 11, 2011
Day 95
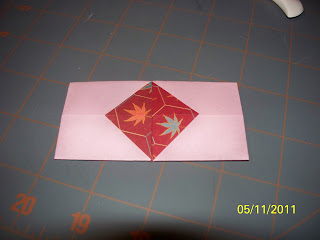
I'm reading a really good book on my Kindle called "Bloodroot" by Amy Greene and because of this I needed a quick craft so I could get back to my book! You readers out there will understand!
I went with my trusty Origami Stationary book and whipped up a Diamante origami fold which can be used as either an envelope or note. I decided I'm going to use all the origami stationary that I have done in a journal of some sort, like perhaps glue them or somehow put them in a journal, but write in them, on some of the pages instead of the actual journal. Just a thought, but I really like the origami have been turning out and I don't want them to go to waste.
Here is the Diamante origami finished:

Here is the paper I used:

Here is half way through the folding:

And another shot of it all done:

And here is the back, a bit hard to see though:

Tuesday, May 10, 2011
Day 94
I have no idea why I didn't come up with this craft idea sooner. I saw a similar craft online today, and revised it to tiles I already had done. For our wedding, we had planned on making coaster sets with movie monster posters as give away gifts, raffle item type thing...it was going to be so much fun...but anyway, I had made a couple sets to see how they would go, and now that the wedding has been upended, well I had them laying around and wasn't too sure what to do with them. Then today I saw ceramic tile bookends online and I thought "DUHHHHHH"!!!!! I have so many books lying around, so of course a set of bookends would be perfect!
All I needed was four of the movie poster tiles I had already done, four plain tiles and the hot glue gun. I hot glued one movie poster tile to one blank one, so I then had four sets of sandwiched tiles. I then took one set and hot glued it to the edge of the other. I didn't even have to wait for it to dry, it dried on contact!!! Which is why they are a bit crooked, I didn't have time to correct it. But overall, they are F A N T A S T I C!!!!
I am totally in love, I want to sell them to the masses, because they just are so fun and awesome!
Here they are done and doing what they were made to do:

Here they are before I glued everything:

Here is a close up of the finished bookends:

And a front view of the finished bookends:

Subscribe to:
Posts (Atom)